How to make facial composites / facial averages (with GIMP)
Step 1: Picking the population
The first step is figuring out which group of people or population you want to make a composite of. For the purposes of this tutorial, I will be using the South American heads of state. Obviously, they are public figures. I do not want to create a facial composite for this tutorial using non-public figures, seeing as I will be showing each individual face.
Step 2: Finding and picking suitable images
The second step is picking the correct images. I’ve made a lot of facial composites and have gave myself headaches many times from not selecting the suitable images. For instance, sometimes I would pick images where people weren’t looking directly at the camera. In those cases, I would have to adjust the direction of their irises, which takes a lot of work. The same goes for smiling—if someone is smiling, you would need to close their mouth, which is time-consuming. Smiling also changes the shape of the eyes in ways and I am not sophisticated enough to bring them back to a neutral state.Generally speaking, we want to find pictures where people have neutral expressions. Regarding glasses, they also take time to edit out. Most of the time, glasses won’t interfere much, unless they make the eyes appear larger or the frame blocks the eyelid or eye creases. The eyelid and eye creases are a very important area, so it’s best to avoid using pictures of people with glasses if the frame obscures the eyelid. Likewise, glasses might also obscure the eyebrows.
Of course, depending on the population you’re trying to make a facial composite of, it might be difficult to find enough suitable images. In that case, it might be worth using an image where someone is smiling or wearing glasses and then doing the time-consuming but necessary edits. For example, if you’re creating a facial average of Spaniards, you’re dealing with a large population, so it’s more efficient to find images with the right features upfront instead of spending time editing imperfect or problematic ones.
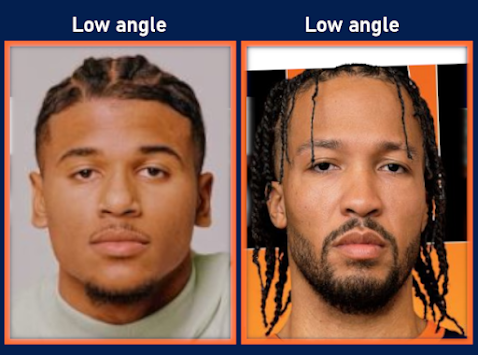
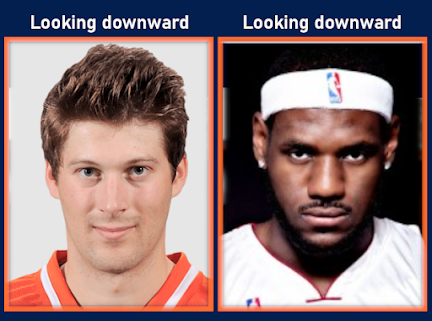
The more challenging aspect is evaluating the angle of the image or the angle of the person’s head. For me, it was difficult to identify whether a shot was straight on or had a slightly low angle. The problem with low-angle and high-angle shots is that they can drastically affect every feature. For example, if you have too many low-angle shots in a facial average, it will make the eyes look like they are looking downward. This is because, in a low-angle shot, the person must be looking downward to look at the camera. High-angle shots, on the other hand, can make the chin appear way smaller.
The best example of this is the shape of the nostrils—if you take a picture of yourself at a high angle and then at a low angle, you’ll see how much the shape of your nostrils changes. So, you need to pay close attention to the angle of the photo. See the photos below and pay attention to the nostril hole shapes.
An upward face is caused by someone either looking upwards by tilting their head back or from the camera being significantly lower then the person's head. The downward face is caused by the opposite: someone looking downwards by tilting their head forward or the camera being significantly higher than the person's head.
Beyond high-angle and low-angle shots, the same issues arise if the person is looking upward or downward, even in a straight-on shot. Avoid those types of images as well.
It’s easier to identify problematic horizontal angles. For instance, if the distance between someone’s eye and ear is much larger on one side of their face than the other, you can tell that they are looking to the side, even if it's quite slight. Vertical angles have always been more challenging for me to discern, but getting both horizontal and vertical angles correct ensures an accurate head shape at the end.
Now, if I’m doing the heads of state for South American countries, not all of the photos I have are ideal. This is because when we're trying to find a photo of a specific person, there’s a chance that no ideal images of that person exist. It’s much easier to find ideal photos of people from a general population. However, because this is a public blog post, I am only using people who are public figures. As a result, I’m stuck with some less-than-ideal images, but that’s all right because this is just a tutorial.
Also, as a side note, I am only including men in this facial average. Since the head of state of Peru is a woman, I opted to use their prime minister, who is a man, instead of their president.
Step 3: Rotate, resize and align all images
All right, so now that we have all the images we're going to use, we need to align them properly. This includes resizing and rotating them as well. To do this, I usually have a base face that I align every single face to. I use this method for every facial composite I create so that they are roughly the same size. If it's the first composite you're working on, just pick one of the images and make that the base layer you'll use for comparison and sizing.For this tutorial, I'm going to use one of the Tajik facial averages I made for a recent post as the base to compare sizes to.
I always pull a horizontal guide down from the top and place it around the nose. This helps me ensure that, when I rotate the images, they are correctly aligned and not skewed or tilted.
The square in the center of the scale tool (made of four smaller squares) allows you to move the image while keeping the opacity visible, making it easier to scale and align the image as needed.
Here’s my process for making the size correct:
First, I align the scleral widths of one of the eyes to match. This generally makes the faces roughly the same size
The same principle applies to rotation. People's features are asymmetrical, so you can’t rely on just one feature to rotate the face correctly. For example, the edges of the nostrils, the corners of the lips, the bottoms of the earlobes, or the lateral canthi of the eyes might not align perfectly on someone’s face. From doing facial averages, I’ve learned that asymmetry is completely normal—one eye might be higher than the other, one nostril might be higher, or one lip corner might be slightly elevated. This is all standard.
For alignment, I usually stick to lining up the eyes vertically. While this may not be the most precise method, I’ve used it for hundreds of facial composites, and it seems to work well. Plus, it’s quick. Other alignment methods, like centering the entire head, can be difficult because of varying hairstyles. It’s hard to tell where the top of someone’s skull is, so you end up estimating, and it feels like a crapshoot.
Step 4: Contrast, lighting, etc.
The next step is fixing the lighting, contrast, and other issues in some of the photos. Chances are, some photos will have poor lighting or contrast. The first thing I usually do is apply a white balance to every single layer. This step alone resolves most lighting problems.
To save time, I use a program called TinyTask to automate many of these repetitive tasks. Since GIMP doesn’t allow you to apply the same adjustments or effects to multiple layers at once, TinyTask can help automate those processes. I highly recommend downloading TinyTask and getting familiar with it.
You can save the keystroke recordings, reuse them later, and avoid having to re-record them. This is especially useful if you plan on making several facial composites. Also, check out the preferences tab in TinyTask—there are many settings in there that can be helpful, like how many times a loop plays back and how quickly it plays back. Just note that if the loop includes mouse clicks or mouse movement, you won't be able to run it at 100x playback speed. However, if the loop consists solely of keystrokes, you can run it at 100x playback speed. So, when designing your keystroke patterns, try to make them in a way that avoids mouse movement or clicks. While that's not always possible, it usually is.
After completing the white balance, there might still be images with lighting issues. For this, I would recommend using the exposure tool. You can increase the exposure if the image is too dark in some places, or if the image looks too dull, you can slightly increase the black level to make it more vibrant. The brightness and contrast tool also works well for this purpose.
Step 5: Contrast, lighting, etc.
All right, the next step is to find the average points of the eyebrows, irises, lip line, and nostrils.
To do this, we’ll make all the layers visible. There’s a quick way to do this: hold Shift + Ctrl and click any layer’s "eyeball" icon to toggle visibility for every layer at once.
Next, we’ll lower the opacity of every image. The important thing to note here is that the total opacity of all images combined should be less than 100, and each image should have the same opacity. For example, if we have 12 images (as in this tutorial), the maximum opacity each image should have is 8.3. However, it’s not critical that the total adds up to exactly 100; it can be lower. You could set the opacity to 3 or 5 for each image. As long as the total opacity remains under 100, you’re fine.
There are several keyboard shortcuts you can assign to adjust a layer's opacity. For instance: one shortcut will set the opacity to zero, another will set it to 100, two increment it up or down by 10 and two others increment it up or down by 1.
Create a TinyTask keystroke pattern to adjust opacity for all layers, saving yourself significant time—it can take seconds with TinyTask compared to minutes manually. This is especially useful if you’re making multiple facial composites. Plus, you can do other things while TinyTask is running! For a long loop, like one that runs for five minutes, you could wash some dishes. Even for shorter loops, like 20 seconds, you could do a hamstring stretch or some jumping jacks.
The next thing we need to do is change the group of overlay modes from Default to Legacy. In Legacy mode, every layer contributes evenly to the final image, whereas in Default mode, the layers on top (higher in the stack) have a much greater influence on the final result.
Then place a background that is a dark red. I find that dark reds are the best for being able to see the features of the composite in progress. We need to be able to see the features because now we're going to adjust the guides around the features I mentioned before.
It can be a bit overwhelming to look at all those guides, so I’ve also color-coded them to match the areas you're focusing on.
(a) The top and bottom of the eyebrows; (b) making a square around the iris, (c) the lip line, and (d) the top and bottom of the nostrils—or just two lines in the center of the nostrils.
You can see that the guides I’ve placed are within the nostrils because, when the distance between the lines is very wide, it’s hard to tell where the center of the nostrils is. What I’ll do is place one guide at the top of the nostrils and one at the bottom. If the space between them is too large, I collapse them. You can make sure you’re collapsing them evenly by checking the indicator at the bottom of the screen, which tells you how many pixels the guide has moved. Just move them by the same amount in opposite directions—for example, move the top guide by -9 pixels and the bottom guide by +9 pixels.
Step 6: Chopping and re-aligning facial features
All right, so now that we have the guides set, the next step is to move individual features on each face to fit within these guidelines. We need to make all the images 100% opacity again. Luckily, there are shortcuts that allow you to do this very quickly with TinyTask.
Once all layers are at 100% opacity, we will use the rectangle select tool (hotkey R in GIMP) to select an area that covers both the left eye and the eyebrow. Make sure that "feather edges" is turned on. The feather radius can be fairly generous—you don’t need to be exact with it. This ensures that when you move the features, there won’t be any jagged edges, and the skin around the moved feature will blend smoothly into the face.
This is a task where TinyTask is very helpful. Without it, this process takes a long time, involves a lot of staring at the computer screen, and can cause eye strain and finger fatigue from repetitive clicking and moving the mouse. It’s not efficient to do manually. I might upload some of my own TinyTask keyboard stroke patterns for others to use, along with instructions on how my GIMP shortcuts are mapped; you’ll need the shortcuts to match for the TinyTask loops to work.
Here’s the basic workflow for this task:
Rectangle select the area as explained above.
Use the copy command and then the duplicate command. This is different from pasting—you want to duplicate, not paste. I can’t remember if the duplicate command is set in GIMP by default, but my shortcut for it is Ctrl + D. So I’ll press Ctrl + C, then Ctrl + D, and then use the "select next layer" shortcut twice. You might want to set up a "select next layer" shortcut in your keyboard shortcuts dashboard.
Next, we’ll move on to the next eye and repeat the process. This time, you’ll need to click the "select next layer" shortcut three times. When we move to the nose, we’ll need to click it four times. For the mouth, we’ll need to click it five times. This is because we’re adding more layers as we duplicate the features.
At this point, we should have all four features cut and duplicated. Don’t worry about the eyebrows for now—that comes last.
Now, we move and rotate (if necessary) each feature. I’ve never had to rotate eyes, but sometimes I do need to rotate the mouth and nostrils. When rotating, I focus on aligning the corners of the lips to be level and, for the nostrils, ensuring they are even laterally.
For the eyes, I position the iris in the middle of the two vertical guides. For the horizontal guides, I align the bottom of the iris with the bottom horizontal line. For the nose, I aim to center the nostrils between the lines. For the lips, I align the lip line to the horizontal guideline.
So then just continue doing this for the rest of the layers. I have not found a way to automate this. There's just too much subjective input, and it would require some type of machine-learning AI capable of identifying facial features and moving them within the specified boundaries designated by the guidelines.
When I’m aligning the eyes, many people’s irises don’t fully show at the bottom because the eyelid is covering them. When this happens, I estimate where the bottom of the iris would touch.
Sometimes, when you have to move a feature a long way—because someone has, for example, a very low mouth, a very short nose, or something that deviates significantly from the average points—you’ll often end up with some "muck" in the image. For example, in this case, we get some muck, which is basically a duplicate of the bottom lip. Honestly, it’s not that important to remove this because it won’t show up in the final composite. Even if it does, we’ll do some final touch-ups during the last stages of creating the composite, so it’s really not a big deal. However, if you do want to get rid of the muck, there are two tools I use.
One tool is the healing tool (hotkey H). You hold Shift to sample an area, tap with the mouse, let go of the mouse and the Ctrl key, and then drag over the area you want to clean up. The other tool is the clone tool (hotkey C). It works in almost the same way. Which tool works better depends on the context. You can also use the smudge tool (hotkey S) to blur and blend things together. To use it, simply move back and forth over the area. Also, keep in mind that you can adjust the opacity of these tools. Oftentimes, the best strategy is to use the clone tool at about 15% opacity. Play around with the opacity levels because they can make a huge difference.
These tools are the same ones I use to remove glasses. It’s a bit more sophisticated than cleaning up muck, but fundamentally, it’s the same. You’ll use the smudge, healing, and clone tools. You should also use the free select tool around the eye to ensure that when you use the clone or smudge tools, you’re not affecting the eye or eyelids. We want to keep these intact as much as possible.When removing glasses, you don’t need to do a perfect job. The blending doesn’t have to be seamless—you just need to remove the frames because they’re usually a strong color that contrasts with the skin tone. Even if only one out of 20 people in the composite wears glasses, the frames can still stand out in the final image.
Step 7: Chopping and re-aligning the eyebrows
Once all the features—the eyes, nostrils, and lips—are aligned and adjusted, we move on to the eyebrows. I leave the eyebrows for last because it’s quicker this way. Up until now, we’ve been using the move and rotate tools. For the eyebrows, we’ll primarily use the rectangle select tool, free select tool, duplicate, and move. Sometimes we’ll also use the clone and healing tools. It’s a completely different toolset, so it’s faster to handle the steps in groups based on the tools being used.
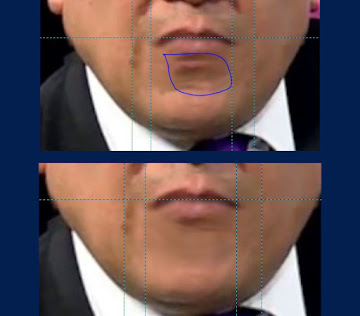
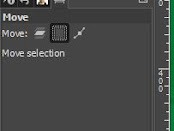
When moving the eyebrows, position them between the guidelines. Determine whether you need to move them up or down. For whichever direction you’re moving them, make a generous selection on the opposite side while selecting as close to the eyebrows as possible on the side you’re moving toward. For example, when moving the eyebrows downward, select closely along the bottom of the eyebrows while including a generous portion of the forehead. This is the same principle used when moving the lips to close the mouth. Any seams or imperfections should be kept away from key features. Once selected, just copy, duplicate, move, and then merge.You can reuse the same free selection shape for the next face, if it doesn't overlap the eye and contains the entire eyebrow. In the move options, there’s an option to move the selection boundary itself. Temporarily set the move option to selection to move the selection over the next image's eyebrows. This can save a lot of time.
Sometimes, you’ll come across someone with very low eyebrows, and moving them up leaves the skin underneath looking messy.
In this case, select the eyebrows, copy them, duplicate them, move the eyebrows up, and before merging the layers, select the face layer below the eyebrow lower. Then use the clone or healing tool to clean the area. Since the new eyebrows are on top of the face layer, the cloned eyebrows won’t be effected by any cloning on it, and the eyes on the face layer shouldn't be affected either so long as you maintain the selection you used to copy and duplicate the eyebrows. So you don't have to be precise with the cloning tools: just go at it. This process increases the amount of skin between the eye and the eyebrow.
Here is an example of when you need to move the eyebrows up. Remember, include a good portion of skin between the eyebrows and eyes in your selection.
Also, keep in mind that not everyone’s eyebrows are symmetrically vertical. In some cases, you may need to move one eyebrow up, one down, or adjust them to different extents.
Step 8: Low opacity and legacy mode, again
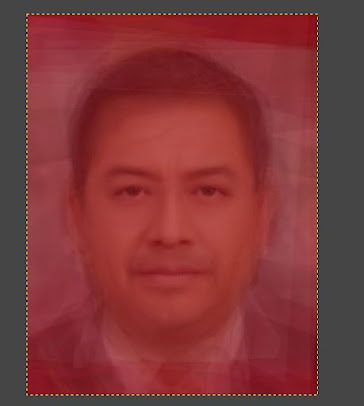
Once all the eyebrows are aligned, we’re ready to lower opacity and switch back to legacy mode. For this step, I lower all layers to 4% opacity and set them to legacy mode.
This will result in an image with much higher resolution than we had earlier, but we’re not done yet. The next step is to deselect the red background. At this point, the composite may look semi-transparent, and it might be hard to make out the face. To fix this, export the image and import it back into your GIMP file as a new layer. Copy and paste it multiple times, and you’ll notice the main image becoming clearer and more defined with each repetition.
Step 9: Clean-up time: head shape contour and smoothing skin
Now, this facial average or composite only has 12 photos. I’m used to working with composites that have, say, 25 or 30 photos. I mention this because cleaning up a composite with around 20 photos is a lot easier than cleaning up one with only 12.
But we can start the cleanup process now. If all of the images in the composite were facing the camera straight on, with the right angle and everything, the head shape should look pretty good and symmetrical on both sides. However, in my case, a couple of the photos had heads that were slightly turned to one side. Because of this, I might need to adjust one side of the face, duplicate it, and flip it to the other side—but I might not have to do that. Either way, I’m going to use the Clone tool to clone the background and basically contour the head shape better, making the contrast between the skin and the background more pronounced. You can also use the Smudge tool at the end to really smooth out the edges and eliminate jagged lines.
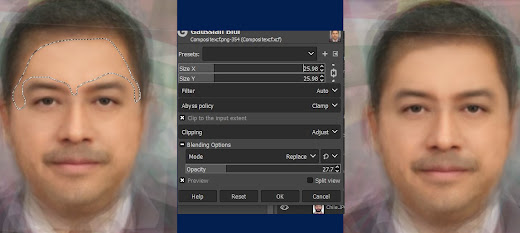
From here, we’ll continue with the same approach, using the Clone tool, Smudge tool, and Healing tool—or whatever tools we need—to make the skin smoother and seamless. You can also use the Gaussian blur tool to make the skin even smoother. Play around with both the opacity and the size of the Gaussian blur because you’ll likely get much better results with a lower opacity and a higher blur radius. For example, using a lower opacity with a higher blur often looks better than, say, applying a high opacity of 100% but only blurring it at a level of 5%.
Step 10: Clean-up time: nostrils, eyes and lips
Step 11: Adding hair, and ears
The final step is adding a hairstyle. I’ll select a hairstyle from one of the photos, choosing the most average hairstyle from a higher-quality image with good lighting. I’ll trace around the hair, duplicate the layer, and resize or stretch it as needed to fit the head of the composite.
Then, I’ll use the Fuzzy Select tool, adjust the threshold setting, and keep feathered edges enabled for smoothness. I’ll delete the background and any skin visible in the hairline.
Historically, I haven't paid much attention to ears, and in most cases, the ears didn't even come through. That’s likely because my image selection process hasn’t been very precise in the past. In this composite, though, one ear came through quite well. To refine it, I’ll copy the ear, flip it to the other side, and lighten it slightly using the Clone tool at a low opacity to make it look more natural.
We're done!
That’s essentially my current technique for creating what I consider high-quality facial composites. Of course, there are ways to improve efficiency. Smoothing the skin, for example, takes a while. But then, is it even worth doing? Unless you’re zooming into the images, you probably won’t notice those details. So, whether it’s worth the effort depends on the project. If you’re making just five composites, it’s probably worth it. But if you’re planning to create 200 or 300 composites, maybe it’s not.
On a related note, I’ve experienced what I call "perfectionism creep" while working on these projects. For instance, I’ll find a new technique to improve the composites, and I’ll be satisfied with the results. But 30 facial averages later, I’ll discover an even better technique and feel compelled to revisit all the previous ones and apply the new method. Then, 50 composites later, I’ll find yet another improvement, and I’ll feel dissatisfied with my earlier work. This can become a cycle, though it’s more of a personal issue and not something everyone will experience.













Comments
Post a Comment